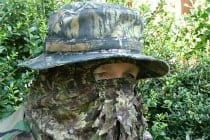
Remember that camouflage does not make you invisible, especially when you are moving. A human face is a dead giveaway to the trained eye against a heavily forested background. Breaking up the pattern and removing the natural shine of human skin is a fundamental component of camouflage.
This article is part 2 of a series of posts (read part 1 of How to Vanish)
Although it may go without saying, I’ll mention it anyway. If you plan to use a face cover then it
Providing it is the correct application, some camouflage is better than none, or worse yet, the wrong camouflage. There are a wide variety of face paints on the market today and that is a good or bad thing. When I was in the military we had the face paint sticks that looked like overgrown crayons, worse yet they were a pain to use and even worse to remove.
If you select a compact that gives you a variety of colors, keep in mind that you should use only the appropriate colors and don’t use every color in the palate. Unless of course you are going to a party and your goal is to look like a clown.
Too many people try using the tiger stripe approach much like you see in the movie “Commando”
Again, some is better than none. However it may make putting on and taking off your gloves a little difficult. For now lets just cover the basics and try to keep it simple. I use a compact with three colors in it: BLACK, BROWN & GREEN
The compact also has a mirror which is a good tool IF you need to use it for signaling or looking around objects such as trees, walls, corners, etc, etc… If your compact has WHITE in it and your background doesn’t call for that particular color, DON”T use it.
SKIP AHEAD
How to Camo Your Face
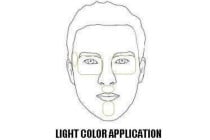
STEP 1: Starting with the areas around the eyes, under the nose, on the temples and under the
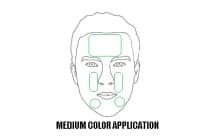
STEP 2: Next, in the areas between the sides of the nose and the cheek, on each side of the chin
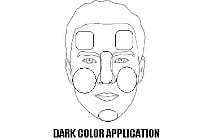
STEP 3: In the areas over the eyes, the cheeks and on the chin I use
Finally, using my fingertips I blend all of the edges together and over the ears and down onto the neck trying to get a feathered subtle blend from one color to the next, much like you would were it airbrushed on. The purpose for this approach, as with any camouflage, is to break up the natural outline of your face, body, gear, vehicle, etc, etc…
When you are applying camouflage to the hands, this same approach should be used, insuring that the lighter colors are used in the recessed areas, a slightly darker color applied to the “middle ground” areas and the darkest colors over the highest areas. Also keep in mind that if you are wearing glasses, goggles or a face shield you run the risk of giving off a “glare”.
In the near future we will cover camouflage for your gear, vehicle, base camp and more. I hope this information has proved to be helpful.
In the mean time, be safe, have fun & stay prepared!
Photos by:
Dick Roster
Commando
FC Brake


