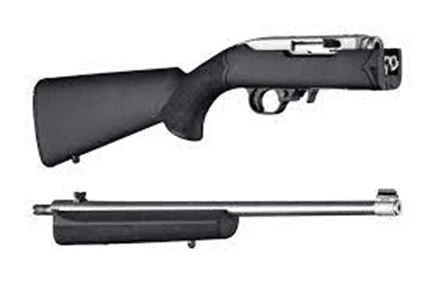
The Ruger 10/22 has been around for half a century and is probably one of the most popular rifles among hunters and target shooters.
If you talk to any outdoorsman, hunter, or firearm enthusiast, most of them likely have a Ruger 10/22 in their gun safe.

Its popularity is deeply rooted in several factors. First, the rifle and the ammunition are both highly affordable. Second, the Ruger 10/22 is accurate, durable, reliable, lightweight, and compact. I have often heard the Ruger 10/22 referred to as “the best plinker” around. Taking it to the range and putting a few thousand rounds through it is easy in an afternoon.
After all that shooting, it is important to take the time to clean the rifle properly and thoroughly. A clean rifle is prone to fewer malfunctions, is more accurate, will last to be passed down through generations, and just looks nice.

SKIP AHEAD
What you Will Need
The products you use to clean your Ruger 10/22 (or any firearm, for that matter) are as important as performing the correct cleaning routines.
I know that gun maintenance and cleaning can be a very personal choice. Some of us have been using the same products and methods for decades. However, times change, technology moved forward, and sometimes there are better methods than those we learned years ago.

Before cleaning your Ruger 10/22, you should be prepared with all your equipment and cleaning supplies on hand. Having to stop halfway through to find a tool or run to get a fresh bottle of gun cleaner is frustrating and inefficient.
In general, this is a list of tools you will need:
- A level work surface – I prefer a hard top on my workstation that is impervious to oils and solvents. A plastic folding table is an excellent choice.
- A mat or towel for padding – Commercial cleaning mats are often not washable. An old bath towel can be washed regularly. If it becomes damaged or too soiled to salvage, cut it into smaller rags or simply dispose of it properly.

- A bottle of solvent – There is a lot of debate about the best solvents on the market. My take is to find the one that you like and use it. I prefer my old standby, Hoppes.
- A bottle of gun oil – Again, a lot of room for debate on this one. Whether you go with a natural product or one of the new synthetic lubricants is a matter of personal choice.
- Cleaning patches – Ensure you have an adequate supply of the right size patches for the caliber of rifle you are cleaning.
- Dry rags – Have plenty of clean, dry rags to wipe up excess oil and solvent. Cleaning a well-used Ruger 10/22 can be a messy job.
- Bore snake – A bore snake is great if you keep it clean. These tools need to be washed frequently and tossed when they become worn, or they lose their effectiveness.

- Cleaning Rods – Many shooters still prefer the old-style brass cleaning rods. I much prefer the newer flexible, cable-style cleaning rods. In my opinion, flexible rods are less likely to cause damage to the lands and groves in the barrel of your rifle.
Disassemble the Ruger 10/22
The overall process for disassembly and cleaning was taken from the Ruger 10/22 owner’s manual.
It is important to follow the correct steps and procedures for field stripping your Ruger 10/22. Failure to follow the manufacturer’s instructions can damage critical parts of your rifle that may render it unusable. Field strip the rifle by using the following steps:
Step 1 – Work Safe
The first step in cleaning any firearm is ensuring that it is not loaded.
Remove the magazine and set it aside. Point your Ruger 10/22 in a safe direction, open the bolt and visually check the chamber to ensure no cartridge is loaded.
Step 2 – Remove the Front Band and Front Band Screw
If the rifle has a barrel band, loosen the hardware and remove the front band screw.
Place any screws and hardware that you remove from your Ruger 10/22 into a bowl or receptacle. I prefer a magnetic parts bowl to keep the small screws and other parts safe.
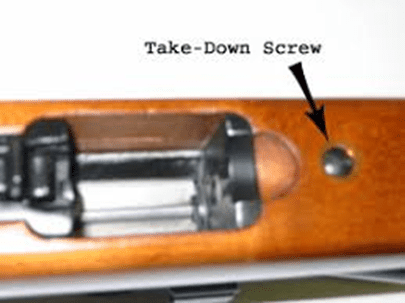
Step 3 – Loosen the Takedown Screw
Using a properly sized Allen wrench, loosen the takedown screw on the rifle’s underside just in front of the magazine port. This may be a slotted screw, an Allen screw, or a knurled thumb screw, depending on the model and age of your Ruger 10/22.
Step 4 – Center the Safety Button
Push the safety in so that there are equal amounts of the safety lever sticking out on either side. If you fail to perform this step properly, you risk damaging the stock on your Ruger 10/22 if you remove the barrel assembly.
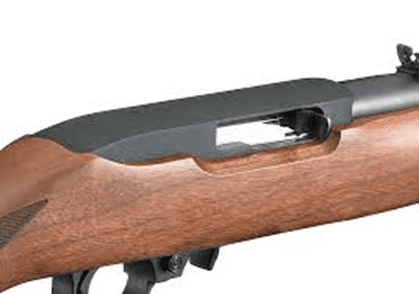
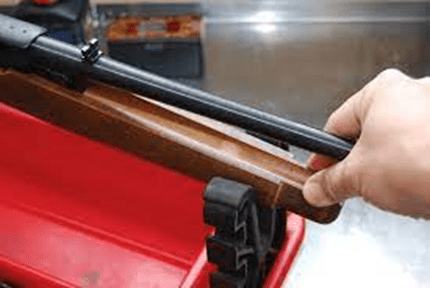
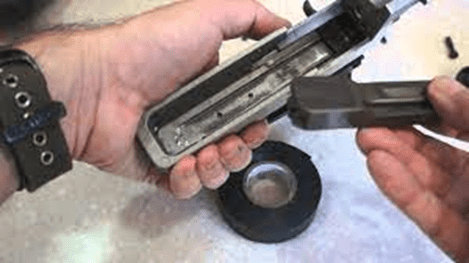
Step 5 – Remove the Barrel and Receiver from the Stock
Grasp the barrel and lift it upward and away from the rifle’s stock. Do this carefully to ensure the receiver cross pins don’t fall out during this step. This may be difficult on some Ruger 10/22 rifles, especially if a custom or aftermarket stock has been installed.
Step 6 – Remove the Trigger Guard
Lay the stock aside. Push the safety to the “on” position. The trigger guard can be removed by pushing out the two receiver pins. However, Ruger recommends that the trigger assembly not be taken apart.
Ruger also recommends that this be the stopping point of disassembly of the Ruger 10/22 for cleaning and inspection. I recommend you go one step further and remove the bolt from the receiver.
Step 7 – Take the Bolt from the Receiver
Turn the barrel and receiver assembly upside down. You should see the bolt stop pin at the rear of the receiver.
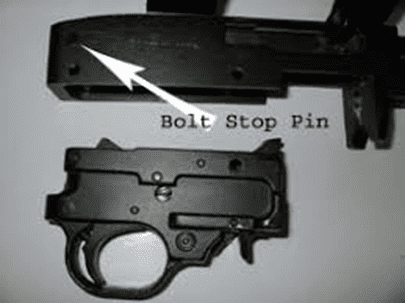
Push out the bolt stop pin using the correct size brass punch. Put the pin aside with the other screws and parts for safekeeping.
Step 8 – Remove the Bolt Handle and Bolt
Pull the bolt handle to the back of the receiver. You can then use your finger to lift the front of the bolt to disengage it from the bolt handle.
The bolt handle assembly can be removed through the ejection port, freeing the bolt to be lifted out and away from the receiver.
How To Clean A Ruger 10/22: Step-By-Step Process
With your Ruger 10/22 disassembled into its component parts, cleaning is a rather simple, if grimy and oily, job. Some of these steps may get a bit repetitive.
Removing powder residue on a .22 caliber rifle often takes a bit of work, especially if the rifle has been run hard under extreme conditions.
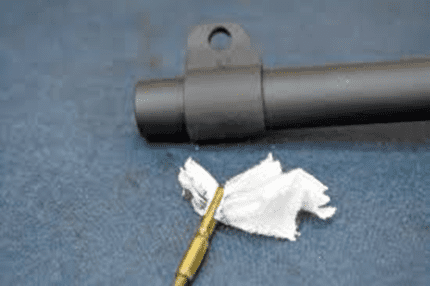
Step 1 – Start with the Barrel
Put a fresh cleaning patch on your cleaning rod and run it down the barrel several times. I prefer to use a cable-style cleaning rod.
I also encourage you to insert the cleaning rod from the muzzle to the chamber before you put the cleaning patch on the tip. My practice is to only put cleaning equipment through the barrel in the same direction that a bullet travels down the tube.
Stubborn carbon and powder residue build-up may require more aggressive means. At this point, you may need to use a bristle brush dipped in solvent.
A brash brush should only be pushed or pulled through the barrel from the chamber to the muzzle. Clean the brass brush after each pass. Never reverse the brush while it is in the barrel!
Step 2 – Repeat with a Fresh Patch
Repeat the process of swabbing the barrel with a clean, dry patch. Inspect the patch after each pass through the barrel. Repeat this step until the patch comes through the barrel clean.
Step 3 – Clean the Receiver and Bolt
Put some powder solvent on a brush or patch and clean any powder residue from all of the rifle’s components and mechanisms.
This may be a bit ticklish as some parts may have small recesses or be in hard-to-reach spots inside the receiver. Keep at it until you can swab all the parts with a clean patch or rag and not see any carbon or powder residue.
Q-tips can make reaching the small spaces inside the receiver much easier. A Q-tip is handy for maintenance to ensure a clean magazine.
Use a clean, dry rag to remove all residue and solvent. Run a dry, clean patch through the barrel to dry the interior, and then repeat this process with a very lightly oiled patch.
Step 4 – Oil the Exposed Parts and Wipe Dry
All other metal surfaces can be wiped with a very lightly oiled patch. Try not to leave too much oil on the surfaces. Too much oil can be problematic since it attracts and holds dust. Oil and dust can build up and inhibit the smooth operation of your Ruger 10/22.
Step 5 – Reassemble your Ruger 10/22
Re-assembly is the reverse of the takedown steps listed above. Be careful when you replace the bolt into the receiver, and ensure that the charging handle and the bolt engage properly.
Position the safety button in the center so you don’t damage your stock when you replace the receiver and barrel back into position. Tighten the takedown screw and re-install the barrel band. You are ready to head back to the range for another day of shooting fun.
Keep it Clean for the Long Term
A Ruger 10/22 rifle is not a huge investment for most people. However, like any precision tool, a gun deserves the best attention to ensure it delivers a long life of dependable service. Your gun deserves to be treated like a fine tool.
I hope this article gives you some better insight into how to clean a Ruger 10/22.
